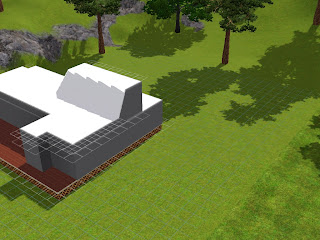
This is the third house that i made in SIMS 3. I really like to make a house that is small, modern and with a touch of nature that is why i choose to use brown and green.
Now i'll show you how to this house...
1. Just do a 10x15 deck and as you can see on the right corner there is an extra 3x4 deck added
2. I put flooring as a mark on where i will put my walls which is represented by the white area. You actually made a T-shape flooring. The brown portion is suppose to be the porch and the white portion will be the house proper.
3. Then put walls following the T-shape flooring as a guide.
4. Then add a 5x1 deck and wall on the left and as you can see i place another wall in front 1 box away. Like what is in the picture. Put a 4x1 wall on the corner. Like in the picture.
5. Now let's go one level up. Make a second floor and follow the pattern above.
After doing the wall put flooring on top. Just like the picture on the right.
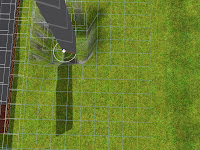
6. Put 5 stairs.Then remove it. After that use click the terrain tools then choose level terrain and level the the most bottom just like what i shown in the picture.
7. Then put a 1x1 deck on the center then 1x1 box up to the second level. So your work should like what i shown in the picture.
8. Then press Shift + Ctrl+ C to open the cheat box and then type constrainFloorElevation false then enter.
By doing so you will be able to lower the walls.
Go to the terrain tools then choose level terrain. Start from the 1x1 box you made then drag it to the second floor of the house. Just like what is on the picture.
 |
| Your house should look like this..... |

9. As you notice the back part of the house is not on the same level like the rest.. So to fix this.
Go down a level then from the flooring inside drag level terrain to the outside.
Remember it should be inside to outside.
Like on the picture..
Then it will flattened...
Clicking the Go up level you will see this..
 |
| Your house should look like this |
"Here is the thing about using the constrainFloorElevation and level terrain tool. Always start from the level you want to achieve and end on the level you want to flattened. Or it is like saying always start from which you want to copy the level."
10. To make the ceiling a little higher Go up one level again. Then follow the T-shape pattern flooring we did earlier but this time do not include the back part. So it like an J. Put forget to put floowing on it.
Then just repeat steps 6-8.. But this time you will add a 3rd level 1x1 wall.
You don't need to enter the cheat code since we did not unable it yet.
!!!! Never mind the windows...
This is what it will look like after...
 |
| TO add some spice... Lets add some more. To do this...See steps below: |

11. Again let's go one level up. Add the fourth level on our 1x1 box on the side. Then on the terrain tools click the lower terrain. It is an icon with a mountain with a down arrow on it. Using the smallest circle tool on it. Click on it for seven times.
Don't worry if it looks distorted it wouldn't affect the house..
After, use the level terrain tool. See the green area on the picture above. Click on it then it will flattened.
In this picture on the left. As you can see i put a 2x11 wall and this is the wall that i will level.
I will not elaborate on the following picture since we already talk about how this is done earlier. Just follow what is on the pictures and you are good to go...
1.
2.
4.
 |
| At the end, your house should look like this. To add up, press Shift+Ctrl+C then type constrainFloorElevation true to disable the cheat |
Now lets go on the first floor. And you will see this.
Now remove the extra wall we put and you house must look like the picture at the right.
Now on the second floor which we lowered we will put a floating flooring on it.. Like what is on the picture
This is the side view so you can see how it is done
Also i already remove the excess deck we put on the ground floor
 |
| Now, the house looks like this.. |
Tadah....
By the way i add a space in the front because i plan to put chair in it...
Hope you like this.....
To upload this house just click on the link below.....


No comments:
Post a Comment